How to Get Your Philippines Visa in 3 Simple Steps
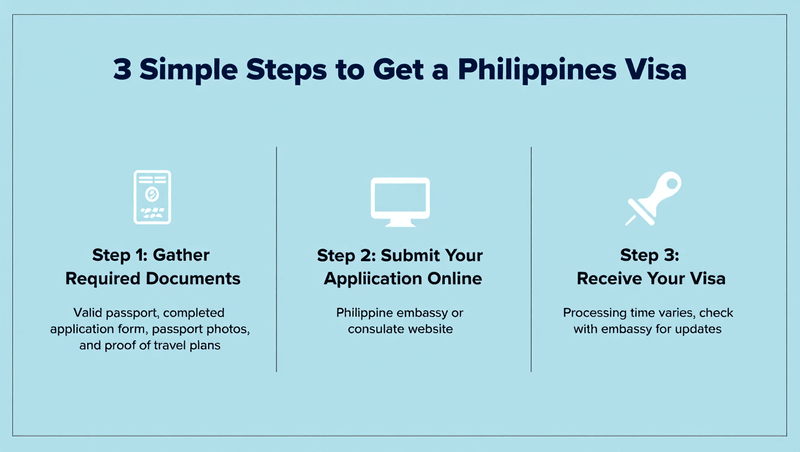
Planning a trip to the Philippines? Getting your visa doesn’t have to be complicated. This guide walks you through the process step by step, helping you secure your travel documents without unnecessary stress.
The Philippines welcomes millions of visitors each year, and the visa process has become more streamlined over time. Whether you’re traveling for tourism, business, or to visit family, understanding the requirements will save you time and prevent delays.
Check If You Need a Visa
Not everyone needs a visa to enter the Philippines. Citizens from 157 countries can enter visa-free for up to 30 days. This includes travelers from the United States, Canada, Australia, the United Kingdom, and most European Union countries.
Your passport must be valid for at least six months beyond your planned departure date. You’ll also need a return or onward ticket to show you plan to leave the country within the allowed period.
If you’re from a country that requires a visa, or if you want to stay longer than 30 days, you’ll need to apply before you travel. Check the Philippine Department of Foreign Affairs website to confirm the requirements for your nationality.
Gather Your Required Documents
The documents you need depend on your visa type and nationality. Most applicants will need a completed visa application form, which you can download from the DFA consular services page.
You’ll need a valid passport with at least two blank pages. Include two recent passport-sized photos taken against a white background. These photos must meet specific size requirements—typically 2×2 inches.
Proof of your travel plans is required. This includes your flight confirmation showing both arrival and departure dates. Some embassies also ask for hotel reservations or a letter from someone you’ll be staying with in the Philippines.
Financial documents show you can support yourself during your stay. Bank statements from the past three months work well for this purpose. If someone else is sponsoring your trip, you’ll need a letter from them along with their financial documents.
Submit Your Application
You can apply for your Philippines visa in two ways: online or at an embassy. The online system (eVisa) is available in some countries and typically processes applications faster through the official eVisa portal.
To apply online, create an account on the eVisa portal. Fill out the application form carefully, upload your documents as PDF or JPEG files, and pay the visa fee using a credit or debit card. The system will give you a reference number to track your application.
For embassy applications, schedule an appointment through your nearest Philippine Embassy or Consulate. Bring your documents in person on the scheduled date. The consular officer may ask questions about your travel plans.
Processing times vary by location. Standard processing takes 5-7 business days, though it can take longer during peak travel seasons. Rush processing is available at some embassies for an additional fee, reducing the wait to 2-3 days.
The visa fee differs based on your nationality and visa type. Tourist visas typically cost between $30-60 USD. Keep your receipt as proof of payment.
Extend Your Stay After Arrival
If you enter visa-free and decide to stay longer, you can extend your visa at the Bureau of Immigration in the Philippines. Extensions are available for up to 59 days at a time.
Visit the nearest Bureau of Immigration office with your passport and departure ticket. The extension fee starts at around 3,000 PHP (approximately $55 USD) for the first extension. Bring extra passport photos as they’re required for the extension process.
Processing usually takes 1-2 business days. You can extend multiple times, but the total stay shouldn’t exceed 36 months without leaving the country.
Common Visa Types Explained
Tourist visas cover most leisure travelers. These allow stays of 30 days initially, with options to extend while in the Philippines.
Business visas are for those attending meetings, conferences, or conducting business negotiations. You’ll need an invitation letter from a Philippine company or organization. This visa typically allows a 59-day stay.
Transit visas apply if you’re passing through the Philippines to reach another destination. You must have a confirmed ticket to a third country and can stay for up to 72 hours.
Student visas require acceptance from a Philippine educational institution. These are issued for the duration of your academic program.
Tips for a Smooth Application Process
Apply at least 2-3 weeks before your planned travel date. This gives you a buffer in case of delays or if you need to provide additional documents.
Double-check that all information matches across your documents. Name spellings must be identical on your passport, application form, and flight bookings. Inconsistencies can lead to rejections.
Keep copies of everything you submit. If your application faces issues, having duplicates speeds up the resolution process.
Some countries allow group applications for families traveling together. This can simplify the process and sometimes reduces the per-person fee.
Answer all questions on the application form honestly. Providing false information can result in visa denial and may affect future applications.
What Happens at Philippine Immigration
When you arrive in the Philippines, you’ll pass through immigration control. Have your passport, completed arrival card, and any required visa ready. The arrival card is distributed on the plane or available at the airport.
The immigration officer will stamp your passport with your entry date and the length of stay permitted. Check this stamp carefully before leaving the counter. If there’s an error, ask the officer to correct it immediately.
Keep your departure card in a safe place. You’ll need to present it when leaving the country. Losing it may cause delays at departure.
Special Entry Programs
The Balikbayan Program allows former Philippine citizens and their families to visit for up to one year without a visa. You’ll need proof of your previous Philippine citizenship and a valid foreign passport.
Long-term visitors can apply for Special Resident Retiree’s Visas (SRRV) through the Philippine Retirement Authority. This program offers permanent residency options for retirees who meet age and financial requirements.
The Special Work Permit lets foreigners work temporarily in the Philippines without a full work visa. Your employer must sponsor this permit through the Department of Labor and Employment, which is valid for up to three months.
Dealing with Visa Denials
Visa denials happen for various reasons. Common issues include incomplete documentation, insufficient funds, or concerns about overstaying.
If your visa is denied, the embassy should provide a reason. Review this carefully and address the specific concerns in a new application. You can reapply once you’ve resolved the issues.
Consider consulting with an immigration lawyer if you face repeated denials. They can review your application and identify potential problems you might have missed.
Health and Safety Requirements
The Philippines requires proof of yellow fever vaccination if you’re arriving from a country where yellow fever is present. Check if your country of origin requires this documentation through the Department of Health.
Travel insurance isn’t mandatory but is highly recommended. It covers medical emergencies, trip cancellations, and lost luggage. Some visa types may require proof of insurance coverage.
During health emergencies, additional requirements may apply. Check the latest health protocols on the Department of Health website before traveling.
Resources and Support
The Philippine Department of Foreign Affairs website provides current visa information and embassy contact details. Use this as your primary source for official requirements.
Most Philippine embassies offer phone and email support for visa questions. Response times vary, but they typically reply within 2-3 business days.
Travel agencies familiar with Philippine travel can assist with visa applications for a fee. This option works well if you have complex circumstances or limited time.
For real-time updates on entry requirements and travel advisories, monitor the official government websites mentioned above, which consolidate information from multiple agencies.
Disclaimer
The information provided in this article on Festive Pinoy is for general informational and educational purposes only. All information is provided in good faith; however, we make no representation or warranty of any kind, express or implied, regarding the accuracy, adequacy, validity, reliability, availability, or completeness of any information on this site.
1. Not Professional or Legal Advice
The content of this article is not intended to be a substitute for professional legal, immigration, or travel advice. The visa process, required documents, fees, and regulations are subject to change at any time without notice by the Philippine Bureau of Immigration, Department of Foreign Affairs (DFA), and individual embassies or consulates. You should not act or refrain from acting based on any information contained here without first consulting a qualified professional.
2. Verify with Official Sources
You are strongly urged to confirm all details directly with official government sources before proceeding with your application. The primary sources of truth are:
- Primary Source: The official website of the Philippine Department of Foreign Affairs (DFA).
- Local Source: Your nearest Philippine Embassy or Consulate, as requirements and processing times can vary significantly by location.
3. No Guarantee of Application Success
Festive Pinoy is not responsible for decisions made by immigration authorities. The approval or denial of any visa application is solely at the discretion of the Philippine government. We assume no liability for any consequences arising from the use of this information, including but not limited to:
- Visa denials, delays, or requests for additional documentation.
- Financial losses due to incorrect information, changed requirements, or cancelled travel plans.
- Issues encountered with visa extensions at the Bureau of Immigration.
- Legal consequences of overstaying your visa or violating immigration laws.
4. Specific Disclaimers Based on Article Content
- Fees & Processing Times: All mentioned costs (e.g., “$30-60 USD”) and processing times (e.g., “5-7 business days”) are estimates for illustrative purposes only and are not guaranteed. Always check the current fees with your specific embassy.
- Visa Extensions: The rules for extending your stay (e.g., “up to 59 days at a time”) are subject to change. Always consult the Bureau of Immigration in the Philippines for the most current extension policies and fees.
- Special Programs: Eligibility for programs like the Balikbayan Program, Special Resident Retiree’s Visa (SRRV), or Special Work Permit has specific and stringent requirements. Contact the Philippine Retirement Authority (PRA) or the Department of Labor and Employment (DOLE) for definitive guidance.
- Third-Party Services: Mention of any third-party services (e.g., travel agencies) is for informational purposes only and does not constitute an endorsement. We are not responsible for their services, practices, or fees.
5. Your Responsibility
By using this site, you acknowledge and agree that it is your sole responsibility to:
- Ensure you meet all entry requirements for the Republic of the Philippines.
- Verify all information with official government sources.
- Submit a complete, correct, and timely application.
If you require specific advice regarding your personal circumstances, we recommend consulting with a qualified immigration lawyer or a licensed immigration consultant.